Connect With A Garage Expert
Connect with local experts, Compare quotes, Get the best price.
Are you tired of battling unwanted drafts, pests, and debris invading your garage through that uneven concrete gap beneath your garage door? Well, we’ve got the solution you’ve been waiting for!
Installing a garage door bottom seal for uneven concrete enhances your garage’s insulation and adds an extra layer of protection against the elements. No more chilly drafts or unwelcome critters creeping in.
In this step-by-step guide, we’re going to show you how to get this crucial job done, and trust us, it’s easier than you might think. So, roll up your sleeves, and let’s seal the deal on those gaps – your garage’s comfort and security depend on it!
The Importance of a Proper Garage Door Bottom Seal

The garage door bottom seal is essential but often overlooked. Here’s why a proper seal is indispensable.
Protection from Weather Elements
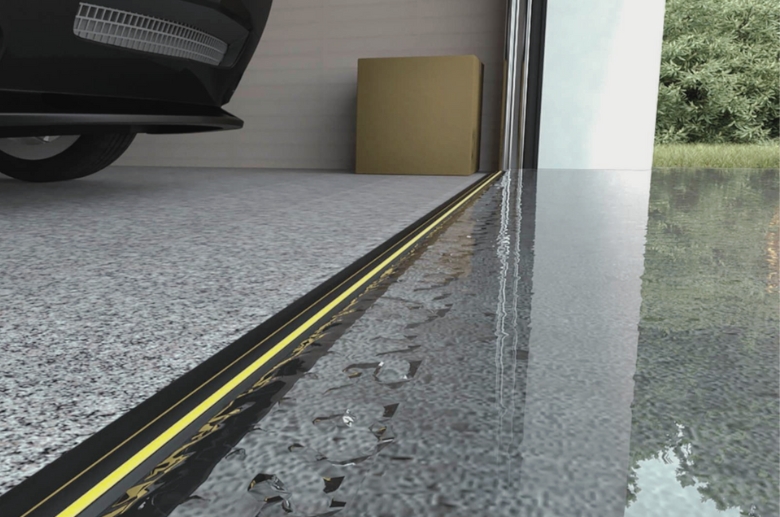
Without a proper bottom seal, water, snow, and rain can easily seep into the garage, causing potential damage to stored items, tools, and even your vehicle. This will further promote moisture buildup, leading to rust, mold, and deterioration of the garage floor and walls. One effective solution to keep water out of the garage is ensuring a robust and well-fitted bottom seal.
A garage door bottom seal barricades the bottom of your garage, preventing these elements from infiltrating your space and safeguarding your belongings.
Insulation and Energy Efficiency
A poorly sealed garage door can contribute to energy loss and temperature variations within your home. Drafts and air leakage around the garage door, often caused by gaps at the bottom, can increase energy bills by 10% to 20% as your heating or cooling systems work overtime to maintain a consistent indoor temperature.
Installing a garage door bottom seal helps create a better seal, minimizing air leaks and enhancing the insulation of your garage. This, in turn, contributes to a 5% to 10% improvement in energy efficiency and reduced utility costs.
According to research, you can reduce your heating and cooling expenses by approximately 15% through the implementation of air-sealing techniques and the addition of insulation in key areas such as attics, floors over crawl spaces, and accessible basement rim joists.
Security from Pests and Rodents
Garages are a prime target for pests and rodents seeking shelter and sustenance. An inadequately sealed garage door provides a convenient entry point for mice, rodents, and unwanted visitors.
Once inside, pests like rats can cause significant disruption in your garage. This includes damaging stored items, contaminating the area with droppings, and posing health risks, such as Hantavirus, Salmonellosis Hantavirus Pulmonary Syndrome, Hemorrhagic Fever with Renal Syndrome, Lassa Fever, and Leptospirosis, among others.
A garage door bottom seal acts as a deterrent, making it significantly more challenging for pests to find their way into your garage, thus ensuring a cleaner and safer environment.
Types of Seals Suitable for Uneven Concrete
Various seal options cater to different needs and provide specific advantages. However, selecting the correct type is essential when sealing your garage door against uneven concrete surfaces. Here, we explore the types of seals suitable for uneven concrete.
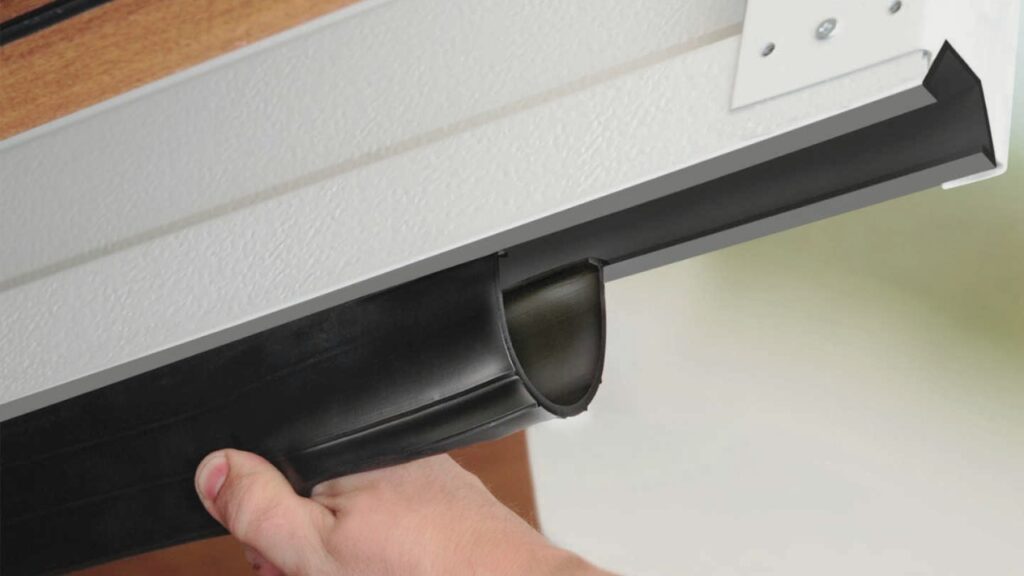
1. Specialized Rubber Seals (Including EPDM)
Specialized rubber seals are designed flexibly, particularly those made from EPDM (Ethylene Propylene Diene Monomer). Their tapered or flexible edges allow them to adapt to the contours of uneven surfaces, creating a secure seal that effectively blocks out drafts, moisture, and pests.
EPDM seals are known for their durability and longevity. They can withstand constant use, temperature changes, and exposure to various weather conditions without losing their sealing properties.
2. Threshold Seals
Threshold seals are designed to create a raised barrier at the bottom of the garage door, compensating for uneven floors. They are available in various materials, but the two common examples of threshold seals include the following:
Rubber Threshold Seals
These seals are often made from heavy-duty rubber and can be attached to the garage floor using adhesive or screws. They create a barrier that prevents water, debris, and pests from entering while accommodating uneven surfaces.
Vinyl Threshold Seals
Vinyl threshold seals are also effective at creating a barrier against weather elements and pests. They are easy to install and can be affixed to the garage floor using adhesive. Vinyl seals offer a sleek appearance and can complement your garage’s aesthetic.
3. Track-based Seals
Track-based seals are installed within a track on the bottom of the garage door. They are adjustable, making them suitable for garage floors with uneven sections. Here are two examples of track-based seals:
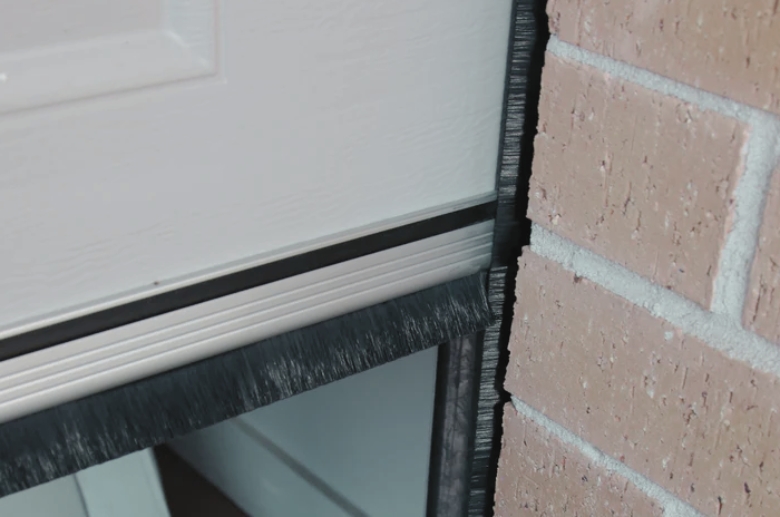
Brush Strip Seals
These seals consist of bristles or brushes attached to a metal or plastic strip. The strip is inserted into the track at the bottom of the garage door. The brushes conform to the floor’s irregularities, providing an effective barrier against drafts and pests.
Bulb-Type Seals
As the name suggests, bulb seals are bulb-like, providing a secure seal when the garage door is closed. They are inserted into the track at the bottom of the door and can accommodate uneven floors by compressing against the surface.
Connect With A Garage Expert
Connect with local experts, Compare quotes, Get the best price.
How to Install Garage Door Bottom Seal For Uneven Concrete
Uneven surfaces require careful preparation and precise execution to achieve a proper and effective seal. This makes it crucial to understand the potential challenges before diving into the garage door bottom seal installation process. Some common challenges include the following:
- Safety Risks: Working with adhesives and power tools carries inherent risks, especially if you’re unfamiliar with proper safety protocols. Incorrect tool usage, lack of safety gear, and inadequate precautions can lead to accidents, injuries, and potential harm to yourself or others.
- Potential for Damaging the Door: An incorrect or improperly installed garage door bottom seal can inadvertently damage your garage door. Misaligned screws, overly tight fittings, or inaccurate measurements can result in dents, scratches, or door warping, leading to a more significant repair or replacement cost.
- Frustration and Disappointment: Attempting a project beyond your skill level can lead to frustration and disappointment. If you’re not prepared for the challenges of working on uneven surfaces, you might find it difficult when faced with unexpected setbacks and difficulties.
With that in mind, let’s explore how to install a garage door bottom seal step-by-step for a clean, energy-efficient, and pest-free garage.
Tools Needed
- Garage door bottom seal kit
- Measuring tape
- Marker or chalk
- Hacksaw or utility knife
- Adhesive (if not included in the kit)
- Screwdriver or drill
- Safety goggles and gloves
- Broom or brush
- Mild detergent (for cleaning, if necessary)
Step 1: Preparation
Good preparation ensures everything is set and the job flows smoothly. Here is how to conduct a good preparation:
Clean the Area
Like most jobs, preparations start with cleaning the area. Sweep the garage floor thoroughly to remove dirt, dust, and debris. If the floor is particularly dirty, wash it with mild detergent and water, then allow it to dry completely before proceeding.
Take Measurements
Using the measuring tape, look for uneven surfaces and take measurements at various points along the door’s width to account for differences in surface height. This ensures an accurate representation of the highest and lowest points of the concrete.
Choose the Right Seal
Based on your measurements, select a garage door bottom seal that provides ample coverage for the door’s length and can accommodate uneven surfaces. Ensure the seal is capable of pressing uniformly against the varying surface heights.
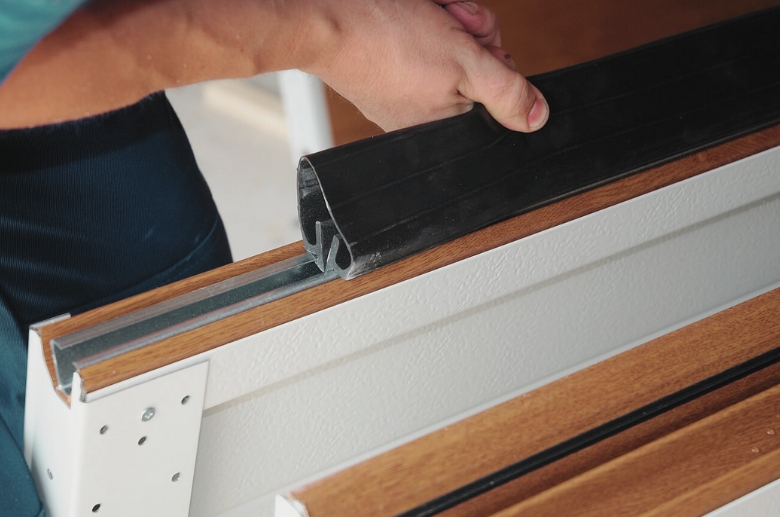
Step 2: Cutting and Trimming
If the purchased seal is longer than the door’s width, trim it to the appropriate size using a hacksaw or utility knife. Ensure you follow the manufacturer’s instructions for cutting to achieve a clean and accurate edge.
Also, double-check the measurements collected before cutting and trimming the final seal for your project.
Step 3: Applying Adhesive
If the seal requires adhesive for installation, clean the bottom of the garage door thoroughly to remove any dirt or residue. This will ensure a strong bond between the adhesive and the door.
Follow the manufacturer’s instructions to apply the adhesive to the bottom of the garage door. Ensure you apply a consistent, even layer to ensure proper adhesion.
Step 4: Installing the Seal
To install the seal, you’ll need to position the seal correctly. Align the seal with the bottom of the garage door, ensuring it is centered and even along the entire length. Ensure accurate placement, as misalignment at this stage can affect the seal’s performance.
If you notice areas where the seal is not making proper contact or alignment is off, consider adjusting the seal’s position. Gently lift the garage door, release the seal, and reposition it as needed. This step might require some trial and error to achieve optimal alignment.
Garage Insiders Tip: This step ensures the seal is correctly positioned and makes uniform contact with the uneven concrete floor. Proper installation at this stage is crucial for the seal’s functionality and effectiveness.
Step 5: Securing the Seal
Suppose the seal requires screws for installation, drill pilot holes at marked intervals along the seal. Gently secure the seal using the provided screws, being cautious not to overtighten the screws.
Step 6: Testing the Installation
After installing the seal, open and close the garage door multiple times to test the functionality of the seal. Ensure it doesn’t impede the door’s movement and provides a snug fit against the uneven surface.
Also, carefully examine the seal to ensure it’s properly aligned and consistently in contact with the garage floor, especially on uneven portions.
Connect With A Garage Expert
Connect with local experts, Compare quotes, Get the best price.
When Should You Call a Professional?
While installing a garage door bottom seal on uneven concrete can be a manageable task, there are certain situations where seeking professional assistance can be a prudent choice. These instances may include the following scenarios:
Lack of Experience
If you’re unfamiliar with DIY projects or working with tools, attempting this installation might be challenging. Professionals have the necessary experience and skills to handle the job efficiently.
Complex Uneven Surfaces
Some garage floors can have highly irregular or complex uneven surfaces. In such cases, professionals have the expertise to ensure the seal is properly aligned and sealed, even in intricate configurations.
Warranty and Guarantee
Many professionals offer warranties or guarantees on their work. If issues arise after the installation, they can promptly address them without additional cost.
Peace of Mind
Calling a professional gives you peace of mind, knowing that someone with expertise is handling the job. This minimizes the risk of potential problems down the line since professionals know to avoid common errors and ensure a flawless installation that effectively seals your garage door.
Time Savings
Installing the seal might take longer than anticipated, especially if it’s your first time. Professionals can complete the installation quickly, saving time and allowing you to focus on other tasks.
Final Verdict
Overall, installing a garage door bottom seal on uneven concrete is a practical and achievable endeavor that offers many benefits. Whether you’re an experienced DIY enthusiast or just beginning to explore home improvement projects, installing a garage door bottom seal for uneven concrete is well within your capabilities.
Simply follow the steps outlined in this guide, and you’re on your way to achieving a secure, energy-efficient, and pest-free garage. Also, ensure you seek professional help if you feel uncertain or if your garage’s unique characteristics warrant expert assistance.